Write AI agents in Java — Agent Development Kit getting started guide
At Google Cloud Next ‘25, last April, Google released Agent Development Kit (ADK) for Python, a flexible and modular framework for developing and deploying AI agents.
Now at Google I/O, a Java version of ADK has been made available! And I’m glad to have had the chance to participate in its launch, via code samples, documentation, and helping shape the API so it’s idiomatic for Java developers.
In this article, my goal is to give you the basis to get started with the ADK framework, in Java, using the Gemini model, and running your first Java agents locally.
Be sure to checkout this video I recorded on how to get started and learn more about some key concepts of ADK:
And if you want to start from a ready-made project with a sample agent using tools, checkout the article on my GitHub template project, or a direct link to the template project.
In the meantime, let’s now focus on the key steps to write your first AI agents with ADK!
Project structure
Create a usual Java project structure like the following, with your Java sources in src/main/java:
[YOUR_PROJECT_DIRECTORY]/
 └—— pom.xml
 └—— src/
     └—— main/
         └—— java/
             └—— agents/
                 └—— ScienceTeacherAgent.java
Let’s have a look at a minimal pom.xml to compile and run your agent:
<?xml version="1.0" encoding="UTF-8"?>
<project xmlns="http://maven.apache.org/POM/4.0.0"
         xmlns:xsi="http://www.w3.org/2001/XMLSchema-instance"
         xsi:schemaLocation="http://maven.apache.org/POM/4.0.0 http://maven.apache.org/xsd/maven-4.0.0.xsd">
    <modelVersion>4.0.0</modelVersion>

    <groupId>adk-agents</groupId>
    <artifactId>adk-agents</artifactId>
    <version>1.0-SNAPSHOT</version>

    <dependencies>
        <!-- ADK core dependency -->
        <dependency>
            <groupId>com.google.adk</groupId>
            <artifactId>google-adk</artifactId>
            <version>0.1.0</version>
        </dependency>
        <!-- ADK dev web UI and API server -->
        <dependency>
            <groupId>com.google.adk</groupId>
            <artifactId>google-adk-dev</artifactId>
            <version>0.1.0</version>
        </dependency>
    </dependencies>
</project>
You just need a couple of dependencies:
- the Core ADK framework dependency, and
- the ADK web server that provides a nice and useful Dev UI to interact with your agents, as well as an API server.
Your first agent
Now that the project is set up, let’s implement a very simple agent. It’ll be a single agent. And it won’t yet use tools to interact with the external world. We’ll explore multi agents and tool support later on, in more advanced articles.
So let’s have a look at a science teacher agent, whose role is to help kids and teenagers understand scientific concepts in a friendly and approachable way.
Here’s the full source code. You can expand this block to see it all, but we’ll explain everything further down, in a piecemeal fashion.
Click to see the full source code
package agents;

import static java.nio.charset.StandardCharsets.UTF_8;
import java.util.Scanner;

import com.google.adk.agents.BaseAgent;
import com.google.adk.agents.LlmAgent;
import com.google.adk.events.Event;
import com.google.adk.runner.InMemoryRunner;
import com.google.adk.sessions.Session;
import com.google.genai.types.Content;
import com.google.genai.types.Part;

import io.reactivex.rxjava3.core.Flowable;

/** Science teacher agent. */
public class ScienceTeacherAgent {

    public static BaseAgent ROOT_AGENT = initAgent();

    public static BaseAgent initAgent() {
        return LlmAgent.builder()
            .name("science-app")
            .description("Science teacher agent")
            .model("gemini-2.0-flash")
            .instruction("""
                You are a helpful science teacher that explains
                science concepts to kids and teenagers.
                """)
            .build();
    }

    public static void main(String[] args) {
        InMemoryRunner runner = new InMemoryRunner(ROOT_AGENT);

        Session session = runner
                .sessionService()
                .createSession(runner.appName(), "student")
                .blockingGet();

        try (Scanner scanner = new Scanner(System.in, UTF_8)) {
            while (true) {
                System.out.print("\nYou > ");
                String userInput = scanner.nextLine();
                if ("quit".equalsIgnoreCase(userInput)) {
                    break;
                }

                Content userMsg = Content.fromParts(Part.fromText(userInput));
                Flowable<Event> events =
                    runner.runAsync(session.userId(), session.id(), userMsg);

                System.out.print("\nAgent > ");
                events.blockingForEach(event -> {
                    System.out.println(event.stringifyContent());
                });
            }
        }
    }
}
So what does the simplest agent look like?
LlmAgent.builder()
    .name("science-app")
    .description("Science teacher agent")
    .model("gemini-2.0-flash")
    .instruction("""
        You are a helpful science teacher that explains
        science concepts to kids and teenagers.
        """)
    .build();
An agent consists of a name, a description, a model, and some instructions, and that’s it! In other articles, we’ll also see how to give it tools, how to use state, how it can interact with other agents and workflows, but for now, let’s stick with this simple science teacher agent.
Running your agent
Let’s say you’ve saved the above agent in a ROOT_AGENT static field of your class (it’ll come in handy for the Dev UI later on). Now we need to instantiate a runner and a session to run the agent.
First, you instantiate an InMemoryRunner with your agent:
InMemoryRunner runner = new InMemoryRunner(ROOT_AGENT);
Then you create a session with the SessionService that you can grab from the runner itself (passing an application name and user ID):
Session session = runner
        .sessionService()
        .createSession(runner.appName(), "student")
        .blockingGet();
Now, if you want to have a familiar chatbot-like experience, you’ll loop over and alternate between user provided messages, and LLM generated answers. Let’s use a Scanner to get the input from the user, inside a big while loop, and send the user’s prompt to the LLM agent, via runner’s runAsync() method, passing the session and the message. The agent will reply with a flow of events that we can then print:
try (Scanner scanner = new Scanner(System.in, UTF_8)) {
    while (true) {
        System.out.print("\nYou > ");
        String userInput = scanner.nextLine();
        if ("quit".equalsIgnoreCase(userInput)) {
            break;
        }

        Content userMsg = Content.fromParts(Part.fromText(userInput));
        Flowable<Event> events = runner
            .runAsync(session.userId(), session.id(), userMsg);

        System.out.print("\nAgent > ");
        events.blockingForEach(event -> {
            System.out.println(event.stringifyContent());
        });
    }
}
Define environment variables
You’ll need to export two environment variables:
- a Gemini key that you can get from AI Studio,
- a variable to specify you’re not using Vertex AI this time.
export GOOGLE_GENAI_USE_VERTEXAI=FALSE
export GOOGLE_API_KEY=AIzaSyDF...
In this article, let’s use the Google AI / DeepMind endpoint and API key for Gemini, but you can also use Gemini from Google Cloud Vertex AI.
Executing the agent from the command line
From the command line, let’s use Maven’s exec java plugin to launch this science teacher agent:
mvn compile exec:java -Dexec.mainClass="agents.ScienceTeacherAgent"
Let’s see the output when asking a simple question about “qubits”!
[INFO] Scanning for projects...
[INFO]
[INFO] -----------------------< adk-agents:adk-agents >------------------------
[INFO] Building adk-agents 1.0-SNAPSHOT
[INFO]   from pom.xml
[INFO] --------------------------------[ jar ]---------------------------------
[INFO]
[INFO] --- resources:3.3.1:resources (default-resources) @ adk-agents ---
[INFO] skip non existing resourceDirectory /Users/me/Projects/adk-agents/src/main/resources
[INFO]
[INFO] --- compiler:3.13.0:compile (default-compile) @ adk-agents ---
[INFO] Nothing to compile - all classes are up to date.
[INFO]
[INFO] --- exec:3.5.0:java (default-cli) @ adk-agents ---

You > What is a qbit? Please answer in a concise manner.

Agent > Hey there, future tech wiz! 👋

A **qubit** (short for "quantum bit") is the basic unit of information
in a quantum computer. Unlike a regular bit in your computer, which is
either a 0 or a 1, a qubit can be a 0, a 1, or *both at the same time*
thanks to something called **superposition**! This "both at once"
ability is what makes quantum computers super powerful for certain
kinds of problems.

You > quit
[INFO] ------------------------------------------------------------------------
[INFO] BUILD SUCCESS
[INFO] ------------------------------------------------------------------------
[INFO] Total time:  0:22 min
[INFO] Finished at: 2025-05-19T01:00:12+02:00
[INFO] ------------------------------------------------------------------------
And the conversation can go on and on, till you’re bored and you enter “quit” to end the chat.
Executing the agent in the Dev UI
ADK comes with a Dev web UI (and API server) that you can use to run your agents, see how they behave, the data they exchange, how they interact with the underlying LLM. So let’s talk about this.
The following Maven command will launch the Dev UI:
mvn exec:java \
    -Dexec.mainClass="com.google.adk.web.AdkWebServer" \
    -Dexec.classpathScope="compile"
Note: You can add a different path or even use a sub-directory (if you want to expose only agents in a certain package) by adding and customising this flag: -Dexec.args="--adk.agents.source-dir=src/main/java/com/foo/agents".
This time, you run the AdkWebServer class from the second dependency (google-adk-dev). There’s one constraint currently for the Dev UI to grab and run your agents: they have to be statically initialized and stored in a public static BaseAgent ROOT_AGENT field. That’s why the class had the following structure:
public class ScienceTeacherAgent {
    public static BaseAgent ROOT_AGENT = initAgent();

    public static BaseAgent initAgent() { ... }
}
To access the Dev UI, just head over to your browser and open the following URL: http://localhost:8080/dev-ui
You should see something similar to this:
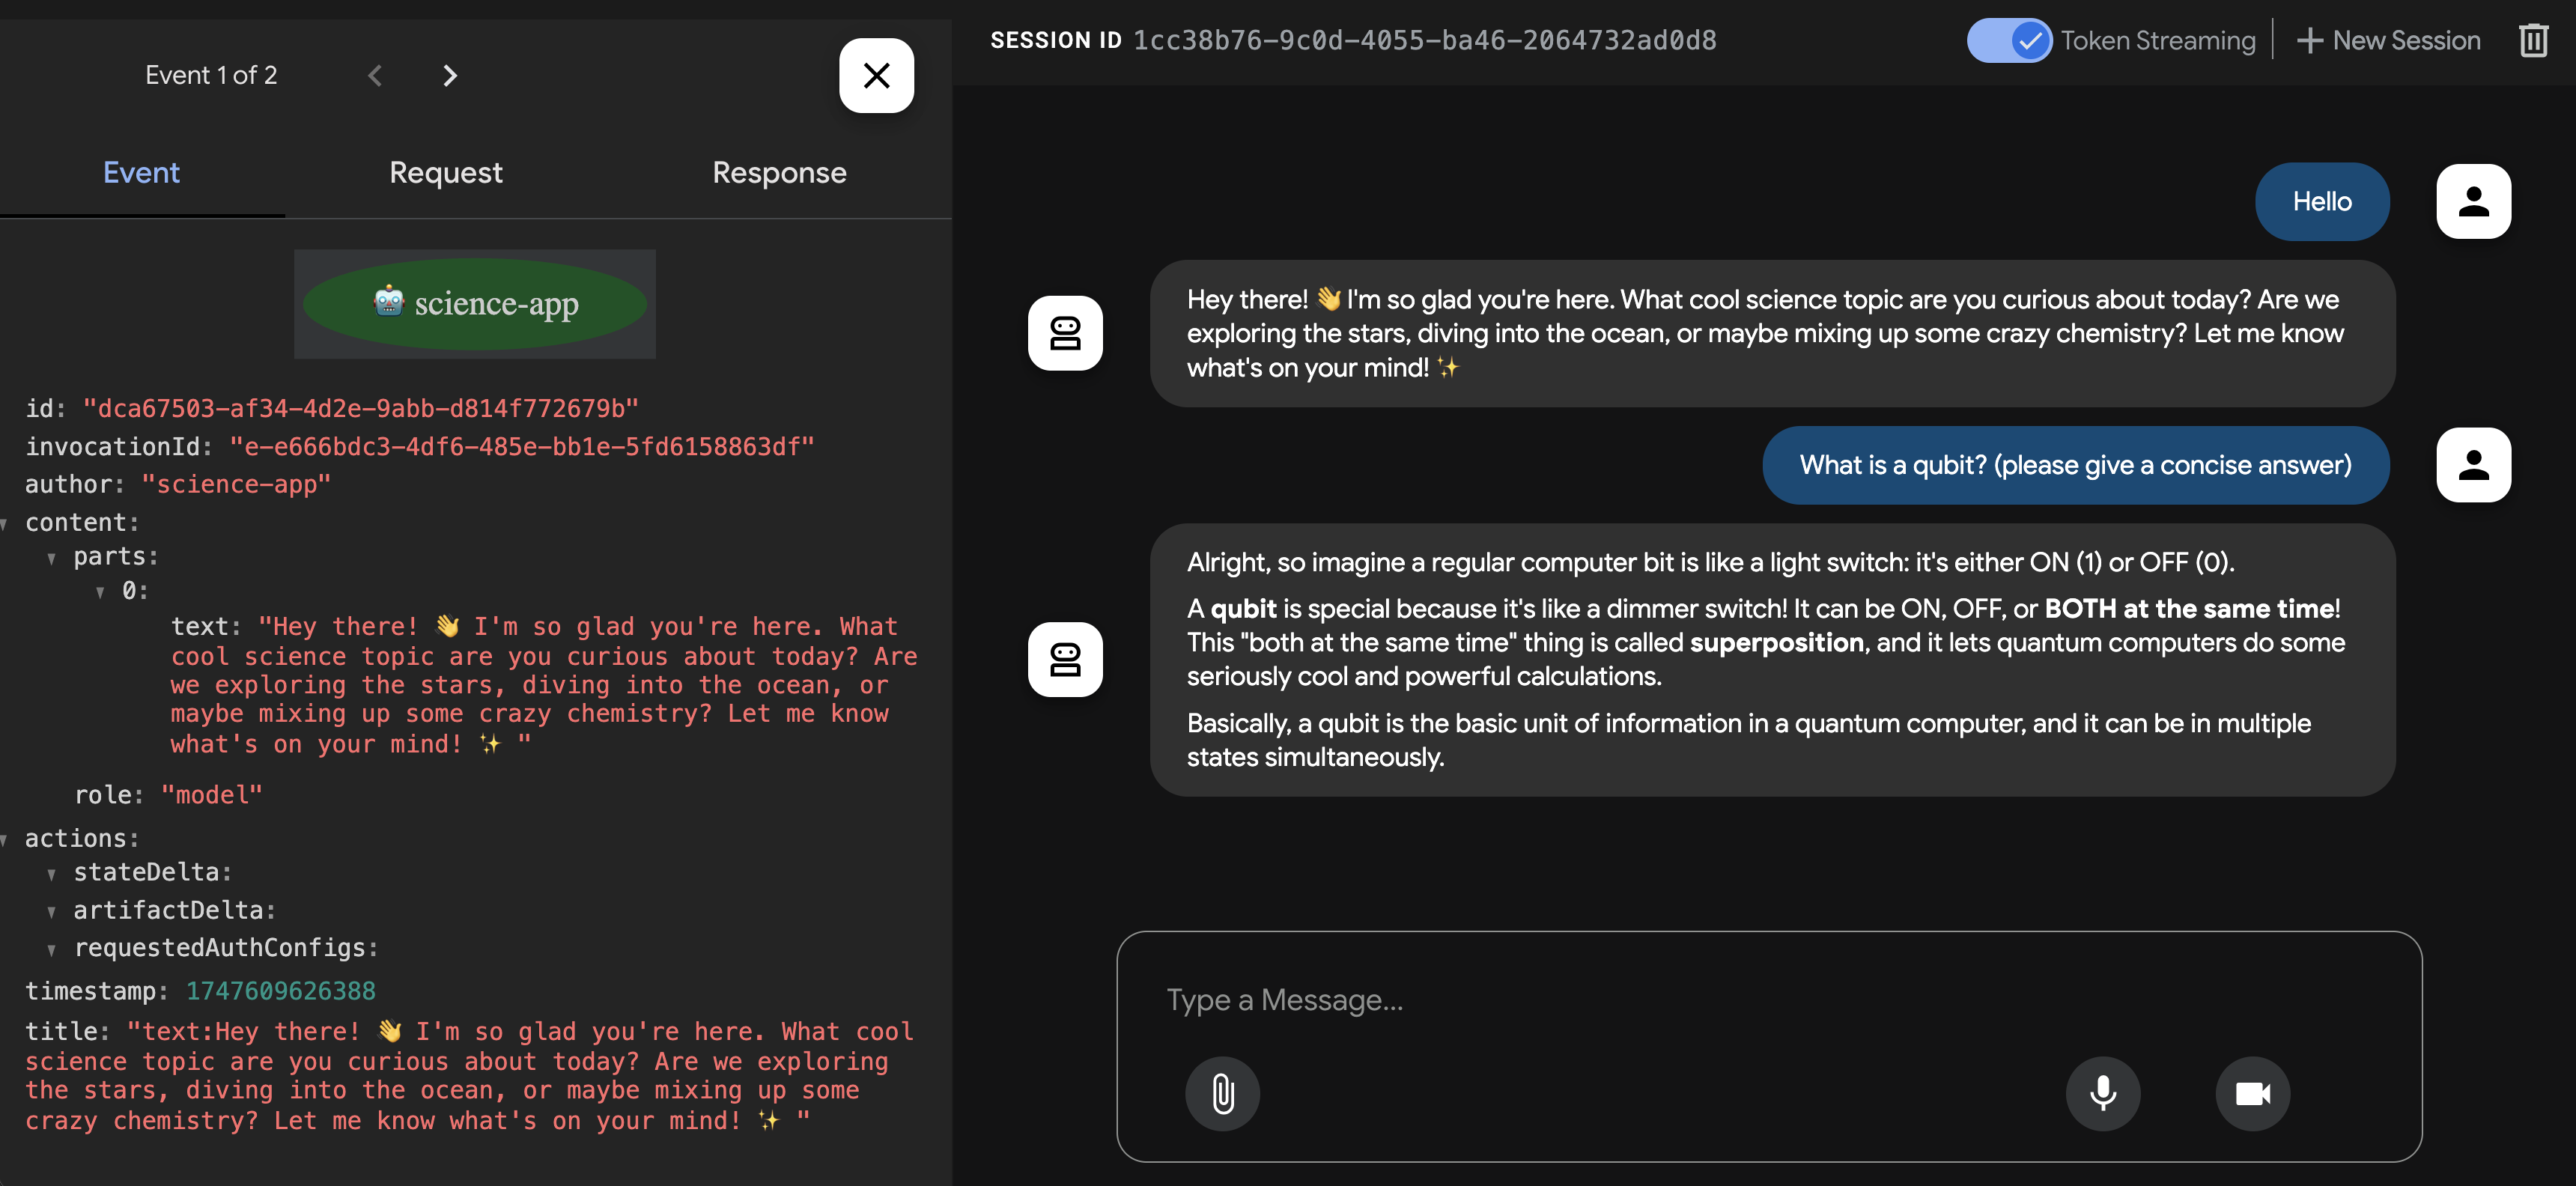
- You can select an agent from the loaded agents in the top left hand corner.
- When clicking on the events, you can see the popup over the left pane that shows all the details of the events that are flowing through, as well as the input request and output response from the LLM.
- On the right side, in the chat area, you can see the dialogue between the user and the AI, as well as potential tool calls.
- You can also enable token streaming at the top of the screen with the slide if you want to see responses being streamed as they are generated by the model.
Congratulations!
Wait, what? Are we already done? Yes, you’ve coded and executed your first Java agent with the ADK framework!
Now what?
Many possible next steps, and also pointers, that I’d like to share with you.
- First of all, read the article announcing the launch of Java ADK, and other news related to Agent Engine, and A2A (Agent to Agent Protocol).
- Think about how you can integrate such an agent inside an existing Java application that you want to enhance with advanced agentic capabilities.
- You may want to deploy an agent on Cloud Run, for example, or host it anywhere else you’d like, as it’s just an open source framework not tied to Google Cloud.
- Start learning more about the concepts behind the framework, and what it’s capable of.
- Check out the source code on Github.
- I’d like to invite you to look at more substantial examples and samples than my science teacher.
- My colleague Abi implemented a patent research and analysis agent in Java, with ADK, deployed on Cloud Run, with data on AlloyDB.
I’m really looking forward to hearing from you about what you’ll be building with ADK for Java! You can expect many more articles on this blog on the topic of ADK. So stay tuned!