How to Integrate Gemini CLI with Intellij Idea Using ACP
The Agent Client Protocol (ACP) allows you to connect external AI agents directly into IDEs and text editors that support that protocol (like JetBrains’ IntelliJ IDEA, PyCharm, or WebStorm, as well as Zed). This means you can bring the power of the Gemini CLI directly into your editor, allowing it to interact with your code, run terminal commands, and use Model Context Protocol (MCP) servers right from the AI Assistant chat window.
This guide will walk you through setting up Gemini CLI as a custom agent in IntelliJ IDEA.
The JetBrains AI Assistant help pages mention that it should be possible to install an AI agent from the ACP registry, but this option wasn’t available for me, at the time of this writing. Hence why I decided to investigate and write this tutorial!
Prerequisites
- IntelliJ IDEA (or other JetBrains IDEs) version 2025.3 or later.
- Node.js installed (version 20+ recommended), needed by Gemini CLI.
- Gemini CLI installed.
Step 1: Install Gemini CLI
If you haven’t already, install the Gemini CLI globally using npm:
npm install -g @google/gemini-cli
Once installed, verify it works by running:
gemini --version
Step 2: Locate the Gemini Executable
You need the absolute path to the installed gemini executable for the configuration file.
On macOS / Linux: Run the following command in your terminal:
which gemini
Example output: /Users/username/.nvm/versions/node/v22.16.0/bin/gemini
On Windows: Run the following command in Command Prompt or PowerShell:
where gemini
Example output: C:\ Program Files\nodejs\gemini.cmd (or similar inside AppData)
Copy this path; you will need it for the next step.
Step 3: Configure the ACP Agent
JetBrains IDEs look for a specific JSON configuration file to load external agents. You need to create or edit this file.
File Location:
- macOS / Linux:
~/.jetbrains/acp.json - Windows:
%USERPROFILE%\.jetbrains\acp.json
Configuration Content:
Create the file (if it doesn’t exist) and add the following JSON content.
Paste the path you found in Step 2 into the "command" field.
{
  "agent_servers": {
    "Gemini CLI": {
      "command": "/path/to/your/gemini",
      "args": [
        "--experimental-acp"
      ],
      "use_idea_mcp": true,
      "use_custom_mcp": true
    }
  }
}
Be sure to set the --experimental-acp flag, as it’s still an experimental feature in Gemini CLI.
Configuration Breakdown:
"Gemini CLI": This is the display name you will see in the IDE."command": The absolute path to the Gemini executable."args": We pass--experimental-acpto tell Gemini to start in Agent Communication Protocol mode. You can also pass other flags supported by Gemini, for example for forcing a particular Gemini model version, etc."use_idea_mcp": true: This is crucial. It allows Gemini to access the IDE’s built-in Model Context Protocol (MCP) server, giving it context about your open files, project structure, and more."use_custom_mcp": true: Allows Gemini to use any other custom MCP servers you might have configured in the IDE.
Step 4: Restart and Connect
- Restart your IntelliJ IDEA to load the new configuration.
- Open the AI Assistant tool window (usually on the right side).
- Look for the Agent Selector. It might be a dropdown menu at the top of the chat or a “More” (…) menu.
- Select “Gemini CLI” from the list.
In the AI Chat window, you should see something like this:
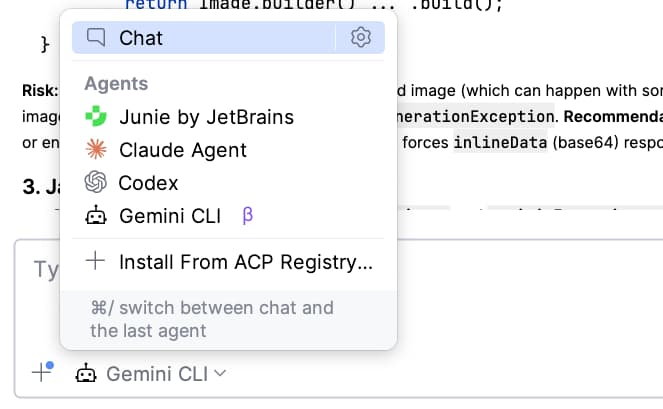
Select Gemini CLI from that drop-down menu.
And you’re good to go!
Usage
Once selected, you can chat with Gemini just like the default AI assistant, but with the added capabilities of the CLI!
- Context Awareness: It knows about your project files via the IDE’s MCP.
- Tool Use: It can perform actions defined in the CLI’s toolset.
Troubleshooting
- Agent not appearing? Double-check the path in
acp.json. If you usenvm(Node Version Manager), ensure the path points to the specific version currently in use, not a generic alias that might not be available to the IDE’s environment. - Permissions: On macOS/Linux, ensure the file
~/.jetbrains/acp.jsonis readable by your user. - Experimental Flag: Ensure you didn’t forget the
--experimental-acpargument; otherwise, the CLI will try to launch in interactive terminal mode and hang.